Quick start
A first slow-motion render takes six steps, all in Properties > Output > TimeShift.
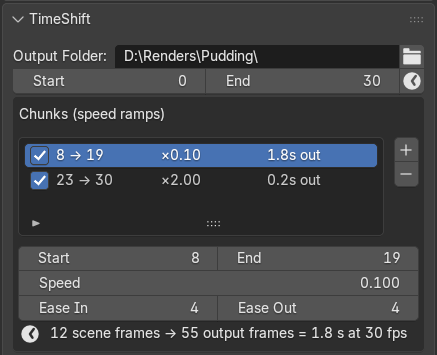
- Pick an output folder. TimeShift writes its own image sequence there and leaves your scene’s own output path as it was. The default, //timeshift/, sits next to your saved .blend.
- Set the render range. Type a start and end, or click the clock button to copy the Timeline’s range.
- Add a chunk. Click + in the Chunks list, then set Start and End to the moment you want slowed, Speed to 0.25 (4x slower) and Ease In / Ease Out to a few frames. In the Timeline you can instead press U and drag across the moment.
- Bake simulations. If the scene has physics, click Bake All Dynamics so caches interpolate between frames.
- Preview. Choose a Shading mode (Material is a good default) and click Preview TimeShift to check the timing in seconds.
- Render. Click Render TimeShift. The line above the button shows how many frames and seconds the result will run.

Import the finished sequence into your editor at the scene’s frame rate: slowed moments now play back slower, everything else at normal speed.